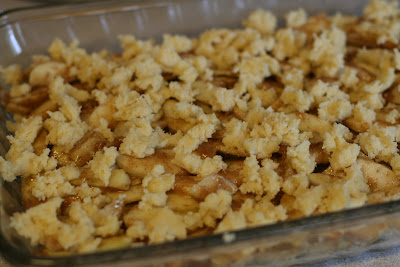
This recipe is a little more time consuming (but not hard) and needs to be prepared with plenty of time to cool. I did not do this. Standby for details.
First you create the crust. Someday I am going to buy myself a pastry blender
Once the crumb mixture is completed, you stir in an egg that's been beaten. Its makes the dough sort of sticky. Then you pat two-thirds of the mixture into the bottom of the pan. However, I misread the recipe and thought I needed 2/3 cup...
I tried for quite a while to figure out how in the world I was supposed to get 2/3 cup to fill the entire pan. Thanks to my husband, who apparently reads better than I do, the problem got resolved by adding 2/3 the mixture...not 2/3 cup.
Once they're cut, you mix them with the other ingredients for the filling and pour the apples on top of the crust. Then you take the remaining 1/3 of the crumb mixture and put it on top of the apples and bake for 40 minutes.
Then your house starts smelling delightful, like yummy apple pie. And 4o minutes later, you pull this baby out of the oven.
Then, I ran into my next problem. There is a part in the recipe that clearly states to let the bars cool completely. Then put on the glaze, and then you have to let that set. Well...I had 90 minutes from the time that I pulled it out of the oven until I served it. After 60 minutes, the bars were still very warm. So into the refrigerator they went.
Then with 15 minutes to spare and the bars still a little warm, I whipped up the glaze and prayed that my freezer was feeling extra chilly today. The recipe suggests to put the glaze into a ziplock bag and snipping a small part on the corner, so that you can drizzle the glaze over. I've done this many, many times and its worked great. This time was an epic fail.
As I started to make beautiful zig zags across the bars with my glaze, the cheapie bag burst open at the part that you "zip" shut. (Do you call that a zipper? Cuz its not, but it is.) So a massive blob exploded out the back and landed on the floor. Dang it. I zipped it back up and kept going...until it did it again. Really?! Really?!
The second time, the glaze just sort of burst out all over the bag and my hands, so I could save most of it. I scrapped it back into the bag and back to work I went. Well, that is until my nice little snip out of the corner burst open too. AHHH! Glaze everywhere all over my beautiful zig zags. Lame. Lame. Lame. The next step involved spreading the glaze evenly all over the bars and completely ignoring any thought of making it look pretty. Curses.
And into the freezer it went. If one thing could go right, it was that the glaze set up very quickly in the freezer. (Note the frosted glass on my dish. LOL)
Then I was able to cut these into bars and quickly get them to the party.
While I was silently vowing to never again purchase generic sandwich bags, I considered taking a picture of my glaze explosions. However, I didn't for two reasons:
1. I was already pressed for time. Taking pictures would have required me to wash my hands, get my camera, etc.
2. I was actually using my extra fridge/freezer that is in the garage. So when I pulled the bars out the fridge, I set them on a box in my garage to glaze them. When the massive explosion happened it was all over my garage floor and down the side of the box. Hardly a photogentic setting. In hindsight, there is a story to tell. So I'm telling it, but I didn't take photos this time.
Lessons learned:
1. Read the recipe correctly. Two-thirds cup does not equal two-thirds of the mixture.
2. Give yourself enough time for things to cool so you're not in a rush.
3. Do not buy cheap sandwich bags if you plan to use them for things other than sandwiches.
4. Take pictures of your mistakes. You can decide later if you want to share them.
Four lesson in one recipe? Yikes. Well, at least they tasted delicious!!


0 comments:
Post a Comment