Saturday, July 21, 2012

Recipe #8 - Overnight Caramel Sticky Buns

A typical breakfast at my house is cold cereal for the kids and oatmeal and a protein shake for me.  It is a rare day that I "make" anything else.  The reason for this is simple; I like to sleep in until I absolutely have to wake up.  Late to bed, late to rise, makes this mommy happy.

With that being said, I love yummy breakfast food.  I just don't like getting up early to prepare it.  Because of this, we have breakfast for dinner more than most people I think.

But last night, I prepped a crazy-easy recipe so that my kids would have a warm, unhealthy breakfast -- Overnight Caramel Sticky Buns.  It is found on page 59 of the cookbook and doesn't appear to be online.

You start with frozen Rhodes rolls in a bundt pan.  P.S.  My Target no longer carries frozen dough.  What in the world were they thinking?!  This is Utah, the capital of frozen dough.  When you use Rhodes, people think you made homemade rolls; after all they did come out of your oven...


Then you just sprinkle a box of pudding, brown sugar and cinnamon on top.  You don't even have to mix it first.  The pecans are optional, and I opted out.


Then you drizzle melted butter over the top.


That is all the prep work.  No mixing.  The only dirty dish is the one with the sticky buns in it.  Easy!  Took less than 10 minutes and that was with me triple reading the recipe and taking pictures.

Then you just cover it with a clean dish towel and let it rise overnight.  In the morning, I found that my steroids butter (see this post) and the warm Utah weather created Bodybuilder Rolls: Sticky Buns on Steriods.  Wowsers!


My husband was gone until after midnight last night, so he didn't see me prep this recipe.  So this morning (since he was awake before me -- surprise!) he lifted the towel to find this massive thing.  Well he thought it was already cooked since it was so big.  He thought I had made a cheddar loaf with sausage crumbles and was a little nervous to eat it. (Sort of looks like that if you don't know what's in it, huh?)

Well I was shocked at how big it was.  Sara and Kate, is this normally the size?  Into the oven it went, and luckily it didn't continue to rise.


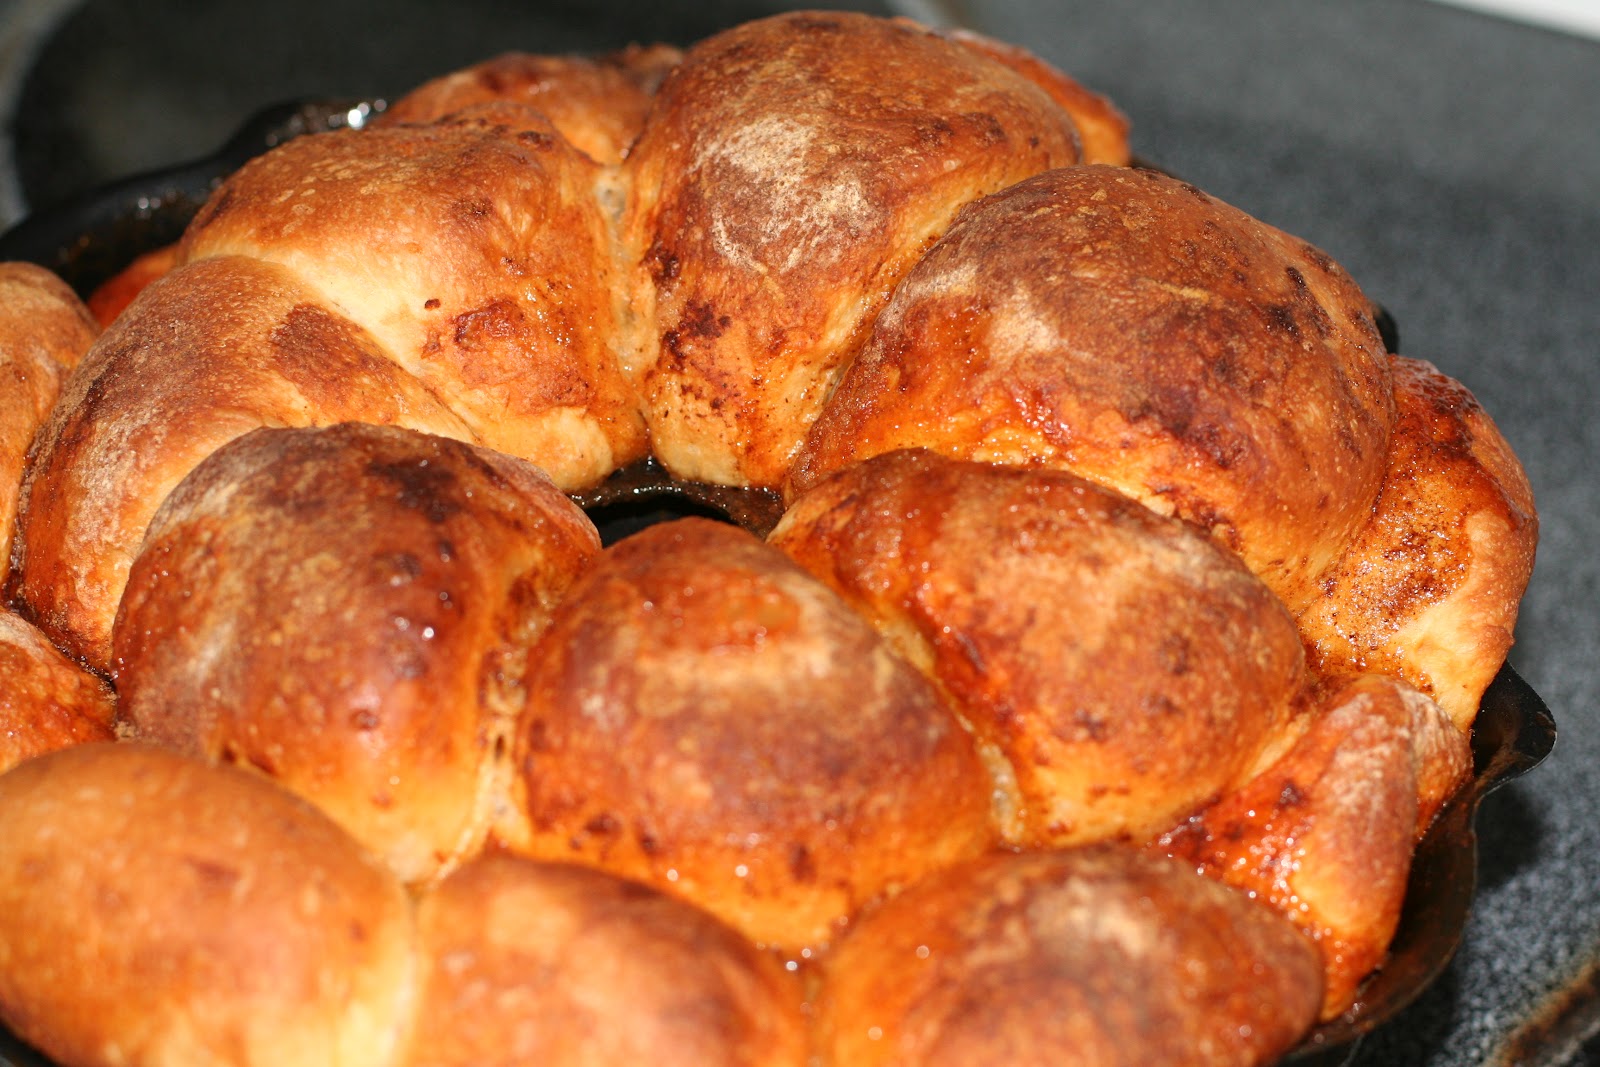
Then you let it sit for a couple of minutes and invert it onto a plate.  This is when the magic happens and the delicious caramel goodness coats everything. 


Now that, my friends, is better than cold cereal!  And do you really think that my kids didn't like it?  Not the case.


You'll notice that we're eating on paper plates with plastic forks.  Miss Molly, the 5 year old, was in charge of setting the table.  She said that she could reach the paper/plastic stuff easier, so that's what she used.  At least she's resourceful...


I think that I need to start logging my elliptical/running hours for you too.  This blog is not good for my waistline.  The more I cook, the more I run.  Took the leftovers to a neighbor so I would stay out of them.  Oy.

Friday, July 20, 2012

Recipe #7 - Pecan Bars

Confession:  I picked this recipe tonight because I knew that no one in my house would like it.  I didn't plan to feed it to any of them either.  We have our annual "block party" tomorrow, and I am in charge of bringing a dessert.  So I picked something that I knew my kids wouldn't like.

The ideas wasn't to feed my neighbors something yucky.  It was to not waste a pan of perfectly good treats on people who say, "Ewww, what's in THAT?!"  Lame sauce, as my 12-year old would say.

So I picked Pecan Bars for today.  Its page 215 in the cookbook, and it doesn't appear to be on the blog.  Sorry.

This is a little more time consuming recipe, but its not tricky.  It is just done in phases.

Phase one: Make the "crust".  Its sort of like a shortbread and its not remotely healthy...sort of like sugared butter!  This is what it looks like before you pat it into the bottom of the pan.


While that bakes in the oven for 13-14 minutes, you mix up phase two -- the pecan pie filling-ish stuff.  This phase can just be mixed by hand.  Easy, peasy.


Once the crust comes out of the oven, you pour the filling over the top of the hot crust.  Since I was more focused on getting a picture while pouring, I didn't really pay attention to pouring it very evenly.  Do your best to pour it evenly though.  Since the crust is still hot and not quite set, it makes it difficult to "spread out" the filling if you just blob it in the center.  But you can get an action shot if you don't pay attention.


(By the way, my eight-year old really digs taking pictures for me!)  Once this is spread out, you cook everything for another 20 minutes.

When phase two came out of the over, I was a little worried about this recipe.  It looked over cooked and sort of yucky.  But I pressed on.

Phase three is a glaze.  Warning, do not lick the spoon.  It is delicious and you will want to lick the bowl.  The glaze just whips up really fast and you (attempt) to pour it evenly over the warm bars.

Well it would be easier to pour it evenly if your dang bars were even to start with!


See why I was a little nervous?  Even with the glaze, it looks yucky.  

Next, you have to let it cool completely before cutting, and this took a couple hours.  My plan was to just cut these bars up and get them on a plate for the party tomorrow.  In fact, I waited until my kids went to bed to even bother cutting them and no one seemed to care since they knew what I was making.

They aren't really pretty, but I'm not sure that is the fault of Sara and Kate's recipe...pretty sure that had something to do with the cook.


But yes what?!  They're yummy!  They are really-bad-for-me yummy.  They are so yummy that I had to plate the bars for tomorrow and only save 4 very small pieces for my family to try in the morning.  Why small pieces, you ask?  Because I know how to cut big pieces down and still have enough for my family to try.  I needed them to not be accessible to me.


Thursday, July 19, 2012

Recipe #6 - Stovetop Kettle Corn

Once upon a time, I was pregnant and craving everything.  Just about any food I saw, I wanted.  I saw a commercial for a Taco Bell Chalupa and had to have one right now.  Grocery shopping was an expensive challenge; they typically want you to pay for your food before you eat it.  Must. shop. faster.

During my pregnancy, I came upon a person selling kettle corn.  Its smelled delicious and I needed it right now.  So I bought a bag of yummy, delicious kettle corn.  And I ate and ate and ate it, until it was all gone.  I recall enjoying every moment of it.

Another issue that I had with this pregnancy (with all of them for that matter) was that at about ten o'clock each night, I was sick,  I would throw up 15-20 times, every single night.  Well, let's just say that the kettle corn did not taste nearly as good coming up as it did going down.  Pretty sure I threw up an entire bag worth too.  Kettle corn just hasn't sounded good ever since.

I was looking at my cookbook last night...while on my elliptical...yes, ironic.  I knew that I was going to be gone for the bulk of the day, and I had very little time to prep anything and no time to shop.  So I settled on the kettle corn recipe because it was fast and I had all the ingredients.  (Recipe can be found on page 256 in the cookbook or here)

IMPORTANT:  Read the entire recipe before you make it.  It is a lot of writing, but still very basic instructions.  It took me 5 minutes from the time that I turned on the stove to the time that the popcorn was ready.  There is no time to be referring to the cookbook during this process.

So simple and so fast!  Heat the oil.  Pour in popcorn kernels and sugar.


Stir to coat kernels, and cover the pot.  Give the pot a shake, rattle and roll.  Literally seconds later, you're done and the popcorn is ready.  In fact, it was so fast that when the popcorn stopped popping (my cue that it was ready) I opened the lid to see what was going on.  Only then did I realize it was done.  Wow!


I've had many friends volunteer to be taste testers, but these cute little things won the opportunity today.


And the verdict?  Loved by all!


My husband thought it was just "okay" but he doesn't like kettle corn at all.  And as for me, I was a little nervous about eating it, since I still have visions of throwing up an entire bag.  But I ate it and it was super yummy.  (Even blogged while munching!)  Surprisingly it tasted similar to the people to mix up huge metal caldrons of it on a cold, wintery night while you're out shopping for Christmas presents.

My only note is that the recipe says it makes about 10 cups.  This sounds like a lot more than it is.  That's probably a little more than a bag of microwave popcorn.  We filled those cute little popcorn boxes and had just a little bit to spare.  If you're feeding a large crew, you'll definitely need more than one batch.

Wednesday, July 18, 2012

Recipe #5 - Herb-Rosemary Focaccia Loaves

When I married my husband, I didn't realize that I was marrying the son of the Goddess of Bread.  My mother in law doesn't just make delicious bread, she teaches people how to make bread.  They pay to attend her classes and eat her food.  The problem?  You see, I had never made a loaf of bread that required yeast until after I was married.  Banana bread?  No problem.  Zucchini bread?  Check.  Yeast?  Scary!

Luckily, I learned.  She shared her recipes and her knowledge, and after baking a lot of bricks, I finally figured things out.  That's not to say that my bread is as yummy as hers, but when needed, I can make it.

Today's recipe is focaccia bread.  It is on page 36 in the cookbook or on the blog here.

It is really a pretty basic recipe -- not a lot of ingredients or skill required.  Mix the dough:

Let it rise 45 minutes to an hour.  Mine was an hour.


Then you divide the dough into two loaves and let it rise another 45 minutes.  Once the second rising has finished (that sounds like a vampire movie - The Second Rising), you brush the loaves with olive oil and sprinkle with salt and rosemary.  Apparently I underestimated how much rosemary I had.  You need 2 T for this recipe and I had the perfect amount for the 1 1/2 T needed for the dough.  So I had to improvise a bit.

A little while back, the Goddess of Bread gave me these two cool dipping bowls and some seasoning made especially for dipping bread.


One of the seasonings is a Rosemary and Garlic mix.  Perfect!  So I sprinkled a little of that on top.  And I, of course, mixed up my olive oil and seasonings to let my dipping oil "mature" in taste.

Now I should have taken a picture of the bread before I put the olive oil on it, because it sort of took the "puff" out of the rise when I did it.  These look a little flat...


Since I put both loaves on the same cookie sheet, they grew together after rising.  (I thought they looked like a butt.  My sweet innocent daughter thought they looked like Mickey Mouse ears.  Oh to be 5 again!)  In rereading the recipe, I'm not sure if they were intended for different cookie sheets or to go together.  It reads "Shape each half into a rounded loaf and place on a greased cookie sheet."

So if you're making these to give away, you might consider two cookie sheets.  If your family is just going to inhale them, like mine did, who cares if they form a butt/Mickey ears.

And the final product? 


It was a delicious hit.  Loved by all, including me.  I would have taken a picture of my kids eating this with their dinner, but between Molly turning her noodles into a fu manchu mustache and then a nose ring (like a bull) followed by some mooing, I forgot.  Besides, by dinnertime, my kids looked like orphans.

Now as much as I like this recipe, I have one from the Goddess of Bread that I think I like better, but it does make two large loaves.  Perhaps this one will be my standby when I need enough for one meal.


Tuesday, July 17, 2012

Recipe #4 - Sweet Potato Fries with Honey Lime Dip

I'm only on Day 3 of my little adventure, and I'm already having a great time.  While flipping through the cookbook last night to determine today's recipe, I thought to myself, "Self, I could totally get through all these recipes before the year is over.  Then what will I do?"  So I decided that I would make all the recipes on their blog too, since they have tons that aren't in the cookbook.  But then I remembered something; there is a new cookbook coming out in September.

"Ahh! I have to be done by September!" I thought.  "I can't be making old recipes when there are new ones to experience.  Egads!"  So then I felt the sudden urge to crank through all the recipes, so I could do all the new recipes too.    I promptly picked two recipes to make today, and then all was well in the world again.  Phew.

Sweet Potato Fries was today's second treasure for my tummy.  (Unfortunately, two treasures equals bonus time on the elliptical.  Dang.)    This is on page 180 in cookbook or it can be found here.

Until about 3 years ago, I was sure that I didn't like sweet potatoes.  My mom only made them on Thanksgiving, and I just thought they ruined perfectly good marshmallows.  (Whoever thought of putting marshmallows on a root vegetable must have been a little tipsy at the time...)  But I tasted a plain ol' baked sweet potato a couple years back and totally changed my tune.  They're good.  They're really, really good.  I'm still not a fan of the 50 grams of fat version on Thanksgiving, but I do like them now.

I especially like sweet potato fries.  I have never made them myself, but I have made the frozen kind for my family and I was the only one who would touch them.  With this history, I didn't know how today's dish would go with my kiddos and hubby.  Stay tuned...

Today's cooking adventure began with these two creatures:


Pretty ugly in the world of food, huh?  And when you peel them to discover that they're radioactive orange inside, they are extra creepy.

The recipe calls for a pound of peeled, cut sweet potatoes.  Not knowing how much a pound would be, I got out my handy dandy scale and started weighing as I cut.


I had two large-ish sweet potatoes and still had extra leftover.  So it doesn't take a ton of potatoes.  After oiling and seasoning, these babies were ready for the oven.


Clearly, I have some work do in the "cutting uniform sizes and shapes" department.  But come on, did you see what they looked like to start with?!  Its not like they're rectangular...

This recipe also calls for a Honey-Lime Dip.  I thought the dip was yummy but you didn't really need it.  The fries were great all by themselves.  And the dip recipe makes tons more dip than you need for the fries.  We had tons leftover.

Here is the finished product:


Yes, in addition to the cute tropical drink glasses, I will also buy myself some new plates when the movie rights sell.  We're still dining on my wedding dishes.  Corelle 1998, folks!  Classy!

Now the question is:  Did my family eat them?  Yes, each and every person tried and liked them.  My husband, who never eats sweet potatoes, even had seconds.  Go Sara and Kate!