Monday, October 22, 2012

Recipe #65 - Crispy Corn Tortilla Strips

You know those cool little tortilla strips that you can get on top of a Mexican salad?  Well, you can make those at home with hardly any ingredients: corn tortillas, canola oil and salt!

You can find this recipe on page 141.

Heat your oil in a large skillet.  The use a pizza cutter to cut your corn tortillas into thin strips.


Then put your first batch of tortilla strips in the oil.  (You'll know that your oil temperature is just right when you put in one strip, and it sinks to the bottom for a second and then quickly rises to the tops and starts to bubble.)


Remove the strips from the oil with a slotted spoon and allow to drain on paper towels.


Sprinkle some salt on top (which I forgot to do before taking this picture apparently) and you're all set! These are great on top of soups or salads.  What will you put them on?


Sunday, October 21, 2012

Recipe #64 - Easy Pretzel Turtles

We have some friends coming over to play games tonight, so I starting thinking about what sort of dessert I could serve.  Of course, by that I mean that I looked to see what recipes I had left in that section of the cookbook.  I haven't hardly touched my other recipes over the last couple of months.  I needed something that a bunch of kids would like and that wouldn't be hard to eat while playing games.

I settled on the Easy Pretzel Turtles on page 255 or online here.

True to their name, they are easy!  Start by lining a cookie sheet with wax paper or parchment paper.  Line it with pretzels.


Then you unwrap the Rolos and place them on the pretzels.


I used my girls to help me with this.  You'll notice which Rolos I placed and which ones they placed.  Holy randomness, Batman.


(I doubled this recipe.  So I bought two "classic" sized bags of Rolos and we only had 4 left from what you see on the tray.  That's a lot of treats!)

Then they go in the oven for 3-4 minutes until they are glossy and melted but still holding their shape.


Then you press whatever toppings you want into the Rolo.  I did nuts and M&M's.


Now be sure that at least one of your Rolo's doesn't get placed in the center of your pretzel.  Then you'll have to taste it to make sure that its okay.  After all, you can't serve it.


I piped some melted white chocolate over half of them.


WARNING!  These have been cooling for 12 hours now and they are still not set up yet.  Give yourself plenty of time to let these cool before you need them.  You can totally eat them while they're soft, but they are harder to serve or give as a gift.


Update:  After 24 hours these were still not set.  Then I got the brilliant idea to put them in the fridge.  Seriously took 5 minutes to set.  Why oh why did I not think about that before?!

Saturday, October 20, 2012

Recipe #63 - Sopapillas

The first time that I remember trying sopapillas was as a kid at a Mexican restaurant in Denver.  The three things I remember about this place were the sopapillas, cliff divers and a man walking around in a gorilla outfit.  I thought it was a the coolest restaurant ever.  As an adult, we traveled to Denver and I really wanted to take my son (who was 2 or 3 years old) to that same restaurant.  Thanks to Google, we found the restaurant known for cliff diving and a gorilla.  Well...at least the sopapillas were as good I remembered them.  The rest was pretty lame from an adult point of view.  I guess some memories are just better left as is.

Now you get to make memories of your own.  Try this sopapilla recipe on page 68, and its not online.  (Seriously, go buy this cookbook if you don't have it.)

In a large bowl, you mix together the flour, baking powder, salt and shortening.  (In hindsight, I would probably do this with a pastry mixer/chopper thingie.  Yes, that's the technical term for it.)

 Then mix in the warm water until smooth.


I had to sort of knead mine to get it to smooth out,  Even then it wasn't super smooth.  I was a little nervous about it and tripled checked that I had read the instructions correctly.  Appeared to be okay so I pressed on.

Then you cover the dough with a towel and let it sit for 30-40 minutes.  Next roll out the dough until its about 1/4 inch thick.


Cut it into 3-inch squares.  Yeah, mind aren't perfect.  Oh well!


Next heat your oil to 375 degrees.


You fry each square until golden brown.  Keep on eye on these babies because it happens fast.  I flipped them halfway through using a slotted spoon.


Let them drain for a minute on paper towels. 


Serve with the toppings of your choice.  We used honey butter, regular honey, powdered sugar, and cinnamon sugar.  We just let the kids pick what they wanted on them.  My favorite was spreading honey butter all over the outside and then sprinkling it with cinnamon sugar.  Dangerous!


The kids made a mess but gobbled them up.  Check out the powdered sugar poofing through the air when she would breathe on her sopapilla.  Love it!


 The older girls all ended up with total powdered sugar faces.

 
Two thumbs up from the "lateover" crew.  (We don't do sleepovers at our house.  We do lateovers instead.)  Molly even gave it a bonus "foot up" as well, she said.


Friday, October 19, 2012

Recipe #62 - Cinnamon Bun Caramel Corn

Since I teach youth theater, sometimes I get the most random songs stuck in my head for months at a time.  Lately its been Christmas music.  It started in September when we began rehearsing for our December show.  You know that crazy lady had Target who is absentmindedly humming "Nuttin' for Christmas" while shopping for back to school supplies with 3 naughty kids?  That's me. 

So when I made this recipe, it didn't surprise me that that I started humming Christmas tunes.  But then it dawned on me, this popcorn tastes like a little Christmas package for my tongue.  Cinnamon and caramel together?  Christmas.  A DELICIOUS Christmas.  In my belly.

You can find this recipe on page 257 or online using this link.

Start by popping some popcorn.  You can break out your air popper or use a natural-style microwave popcorn.  Or you can try my magical trick.  You need these three items.


A lunch sack, masking tape, and popcorn.  Put a 1/4 cup popcorn in the bag.  Fold over the top slightly and tape it shut.


Lay it down in your microwave and pop it for as long as it typically takes your microwave to pop a standard bag of microwave popcorn.  And wallah!  Air popped popcorn without needing to dig the popper out of the bottom of your pantry and dust it before using it.


You'll need to do this twice for this recipe to get the amount of popcorn you need.  You can even reuse the bag and tape.  Just refill the popcorn.

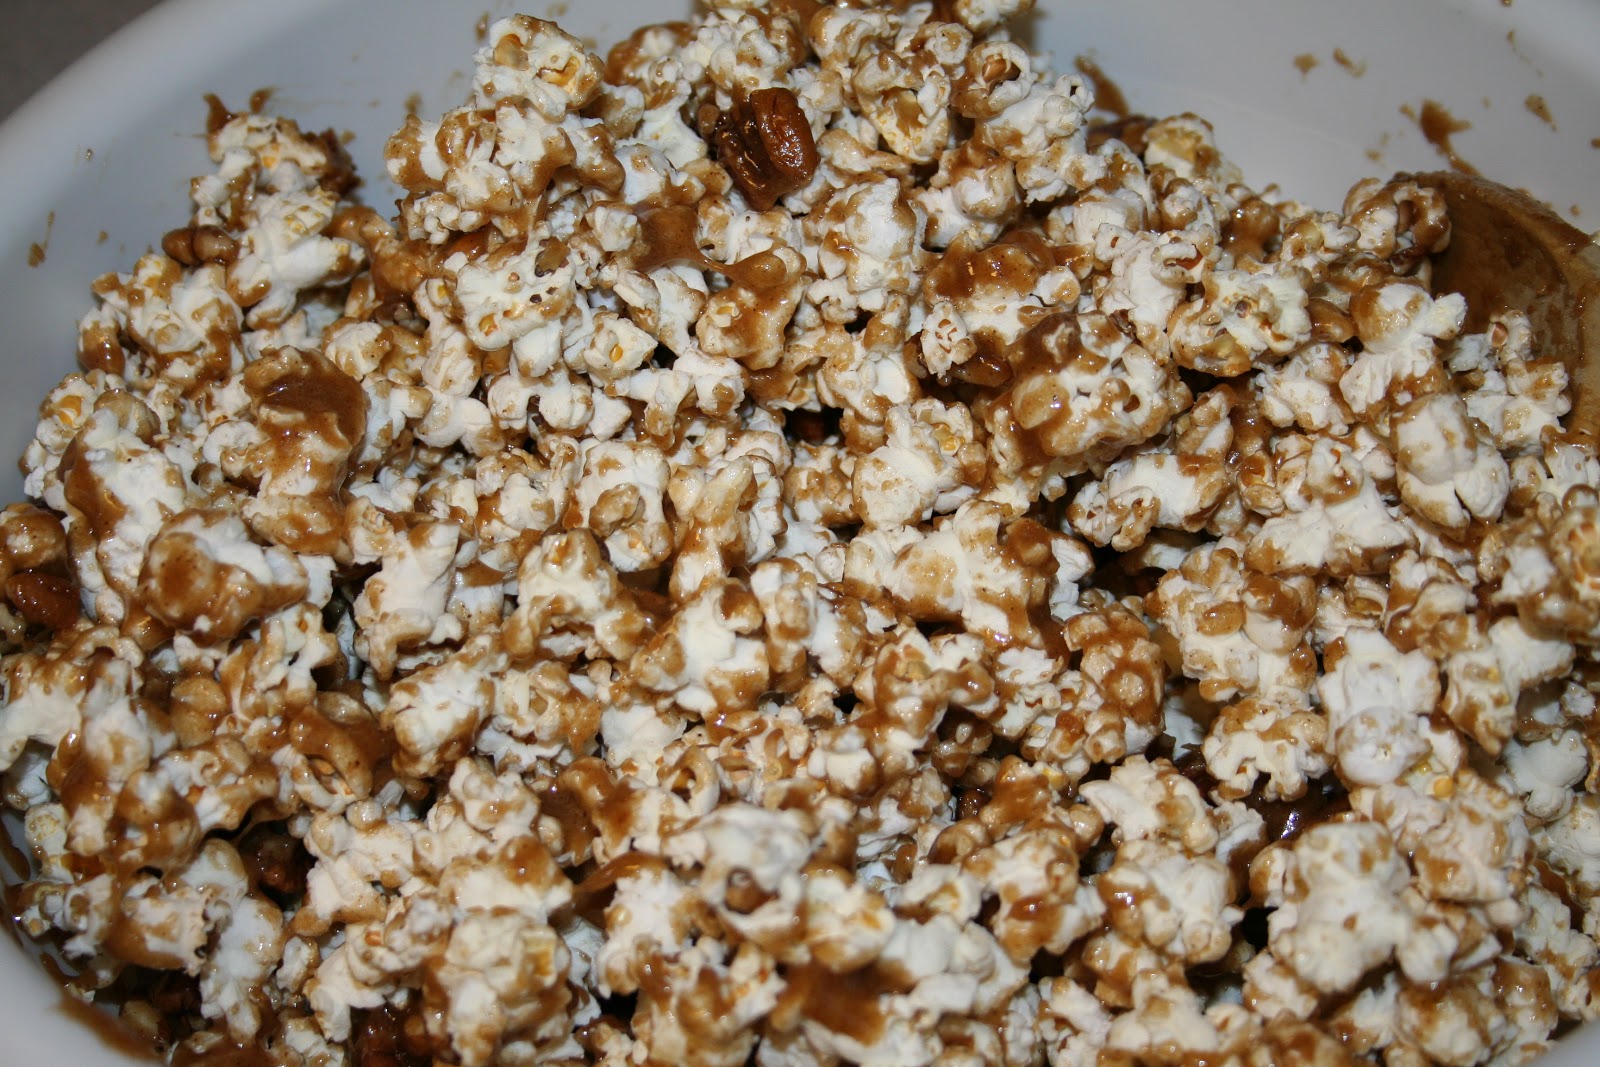
Make sure that the unpopped kernels get removed and put all the popcorn in a large bowl.


 Add the "roughly" chopped pecans.


In a separate bowl, you mix together the cinnamon and brown sugar.  (This is sort of when the Christmas songs will begin to enter your brain.  Just warning you.)


Then you slice up a stick of butter and put it on top of the brown sugar mix.


Then you'll feel your jeans getting a little snugger (Is that a word?  If so, its a weird one and I just used it.  Then I repeated it in my head several times to decide if it was a real word.  Then I left it in my sentence and moved on.) as you add the corn syrup to your butter and brown sugar.


Then you pop this in the microwave to get it all melted.  Next you add the baking soda and vanilla to finalize the caramel.


Quickly pour it over the popcorn and pecans.


Stir until its all mixed up.


Then pour it into a foil-lined jelly roll pan and bake it for 30 minutes, stirring every 10 minutes.  This is the point where you catch up on the last half of The X Factor.  Oh...maybe that was just me.  I think you can ignore those instructions.


After 30 minutes, pour the popcorn out onto some wax paper or parchment paper and drizzle with the melted white chocolate.


So...while I was doing this, I saw a blob of white chocolate on the back of my hand and I, of course, licked it off.  Except that it wasn't white chocolate.  It was liquid hand soap.  Yeah, not my finest cooking moment. 

Once the chocolate hardens you just break this stuff up and inhale it.  I made it with the intention of giving some of it away.  Not sure it will last long enough.  Merry Christmas!


Thursday, October 18, 2012

Recipe #61 - Mexican-Style Sweet Shredded Pork

In Utah, there is a fantastic restaurant chain called Cafe Rio.  Its the kind of place that you crave when you move away from the state.  One of their specialties is sweet pork.   You can get it on their salads or in the tacos or burritos.  It is probably their most popular item, and it is fantastic.

Well ladies and gents, this recipe tastes a lot like Cafe Rio sweet pork.  Brace yourself, cuz its good.

You can find the recipe on page 140 in the cookbook, and I don't see it online.  Really though?  If you don't have this cookbook yet, click on the link to the right and just buy it.  Your family will thank you!  Serious.  Buy it now.

You start with a boneless pork shoulder roast.  (I had to buy two small ones to get the right weight.)  You get it all seasoned up and massage the spices in.


Then you sear the pork for about a minute on each side.  (So funny story...I was cooking something else in my big skillet and thought to myself, "Self, you can totally fit a roast in your small skillet to just brown it.  No big deal."  Not sure if you can tell from this picture, but that skillet was FULL.  Oil was popping out everywhere and it browned crazy-fast.  Note-to-self:  Just wait a couple minutes. Clean the pan and then use the right tools.  Geez, woman.


Now you combine everything you need for your sauce: enchilada sauce, brown sugar, salsa, Worcestershire sauce, and apple juice.  Mix it all up in your slow cooker.


Add the pork roast and cook on low for 7 hours.


After 7 hours of cooking, you shred the pork.  Then return it to the crockpot with some more brown sugar and let it simmer on high with the lid off for 30 minutes.


This gives you time to prep the rest of your meal.  We used the meat to make tacos, but I really wanted to do Cafe Rio style salads.  Alas, I did not shop accordingly and taco fixings were already in the fridge.

When the meat is all ready it will look a little something like this.


We added a little guacamole, a little pico de gallo, some shredded lettuce and a sprinkle of cheese to make our tacos.  My entire family gobbled these up.  My picky eater had 3 tacos for dinner!  She has even just asked for a bowl of the shredded meat as a snack before.  Give it a try.  I'd love to hear what you think!


Wednesday, October 17, 2012

Recipe #60 - Chicken and Dumplings

It was a perfect fall day, and I needed some comfort food.  So I turned to my handy, dandy cookbook and this beauty appeared!  I happened to have everything that I needed and went to work on a yummy dinner just as a fall storm started to blow in.  I couldn't have timed it better.

Chicken and Dumplings can be found on page 104, and it doesn't appear to be listed on the Our Best Bites website.

You start by sauteing the onion and garlic for 2-3 minutes.


Then you add the chicken broth, chicken, bay, leaf, and basil.  Bring to a boil.


Then you add the carrots and celery.  (HINT:  Have all your veggies chopped and ready to go before you even start.  The chicken needs to be cooked and cut up too.  I just happened to do this, and I think I would have timed things poorly if I hadn't.)


Cook until the veggies are tender.


Next add in the parsley.  Fresh or dried works just fine.


Then you stir in a can of evaporated milk.  I used the fat free kind.  Just because it is "comfort food" doesn't mean that it has to be fattening.


Next you mix up a batch of Bisquik biscuit dough.  (I used skim milk on these.)


While the soup is boiling, you drop the dough in by the spoonful.


Then the recipe says to cook until the dumplings "have cooked through".  I had no idea how long that would take, so I consulted the Bisquik box.  On the recipe for dumplings, it tells you to cook them uncovered for 10 minutes and then cover and cook for another 10 minutes.  That's just what I did and the timing was perfect.


It was crazy hot when it was done cooking, so plan a little time for it to cool off.


It may not look super fancy or delicious, but it totally hit the spot.  My youngest did NOT want to even try it, but I told her to just try a dumpling to see if she'd like it.  She tried them and liked them, which led to eating most of her bowl.  My son had seconds and my hubby complimented it several times during dinner.  My pickiest eater was gone tonight, so we don't have a report from her.  But it was a hit for sure.  Give it a try at your house and let me know what your family thinks!